Recently I've been doing some tests with the FortiAuthenticator using FortiMobile tokens. I decided to test out the SMS Gateway feature for sending two-factor one time passwords (OTP) straight to mobiles via SMS (something I generally don't recommend but thought it would be cool to test).
Below is the config I used to setup the FortiAuthenticator to send an OTP via SMS to my moblie for SSL VPN logins.
The steps required are:
The firmware versions I'm doing this config on are FortiAuthenticator (2.2.2) and FortiGate (5.0.4).
So lets begin!
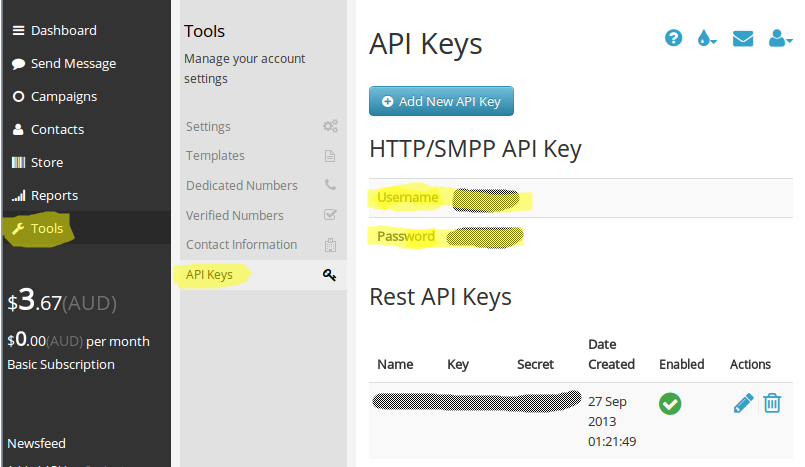
For my SMS provider I decided to try out SMS Global, a quick and easy service that's perfect for testing in labs.
Login to the website and goto Tools > API Keys. Record the user-name and password thats shown here.
2. Configure SMS Gateway on your FortiAuthenticator
Login to the FortiAuthenticator and goto System > Messages > SMS Gateways. Click on 'Create New' to add your SMS Gateway.
Fill in the following fields (ensure you click 'Add another SMS Gateway HTTP Parameter to extend the number of parameters available).
Name: SMSGlobal (or any name you want)
Protocol: HTTP
HTTP Method: POST
API URL: www.smsglobal.com/http-api.php
For the fields use the following:
action = sendsms
user = SMSGlobal username (as per step 1)
password = SMSGlobal password (as per step 1)
from = SMSGlobal (or any name you want)
to = {{:country_code}}{{:mobile_number}}
text = {{:message}}
When you're finished it should look something like this:

Click 'Test Settings' to test the SMS Gateway to ensure it works. Enter in your mobile number ensuring you add + and your country code first. For example Australia's country code is 61. If I wanted to send this SMS to the mobile number 0412345678 then I'd use +61412345678.

Click send and you should get a test SMS on your phone.

Note that the 'from' field we used in the config is what the source name shows up in the SMS. Feel free to substitute this with anything you feel is relevant.
3. Create a remote LDAP server
Now we need to configure the remote LDAP server to import some test users. In this example I'll using our lab's Win2008 AD DC server for our user lookup.
Goto Authentication > Remote Auth. Servers > LDAP and click on 'Create New'. Fill out the details as per your LDAP server's requirements.

4. Import users from a remote LDAP server
Goto Authentication > Local User Management > Remote Users and click on 'Import'. Select the AD server we've created previously and click 'Import Users'.
Tick all the users that you'd like to import (they should show up in green) and click 'Ok'.

The users will now be imported. One thing to note is that the mobile number will be pulled from the 'mobile' attribute in AD. Ensure this is filled out prior to importing the users.

5. Configure user to use SMS for two factor authentication
Goto Authentication > Local User Management > Remote Users and edit one of the users you'd like to configure SMS OTP for. Tick 'Token-based Authentication' and select 'SMS +mobilenumber'.
Next expand 'User Information' and select the SMS gateway as the one we configured previously. Ensure that the users mobile number has populated in the 'Mobile number' field. Click 'Ok' to save.

6. Add the FortiGate on the FortiAuthenticator as a RADIUS authentication client
Goto Authentication > General > Auth. Clients and click on 'Create New'. Enter a name, the IP address of the FortiGate, a password, select 'Enforce two-factor authentication', select 'All remote users' and select the Remote LDAP server we created. Click 'Ok' to save.

7. Add the FortiAuthenticator on the FortiGate as the RADIUS server
Now log into your FortiGate and create a RADIUS server. Goto User & Device > Authentication > RADIUS Server and click 'Create New'. Enter a name and the IP address of the FortiAuthenticator. Ensure the secret here is the same as the one you configured in step 6. Click 'Test' and enter a user-name and password to test the RADIUS is working correctly (try a user that hasn't got a OTP configured yet).

8. Create a SSL VPN user group on the FortiGate using RADIUS as the authentication method
Goto User & Device > User > User Group and click 'Create New'. Enter a name for the group, ensure 'Firewall' is selected for the type and then add the RADIUS server we created in step 7. Click 'Ok' to save.

9. Create a SSL VPN policy referencing this group
Now we'll create an SSL VPN policy to test out the RADIUS logins. Note that I'm only creating a policy for the authentication of the SSLVPN for testing purposes. A proper SSL VPN config would have another policy from ssl.root > interface as well as a static route configured for ssl.root.
Goto Policy > Policy > Policy and click on 'Create New'. Select VPN for the 'Policy Type' then proceed to enter your source/destination int/address. Click 'Create New' under the authentication rules and add the RADIUS group we created previously. Lastly select the schedule and the SSL-VPN portal and click 'Ok'.
Your policy should look something like this:

10. Test out the login
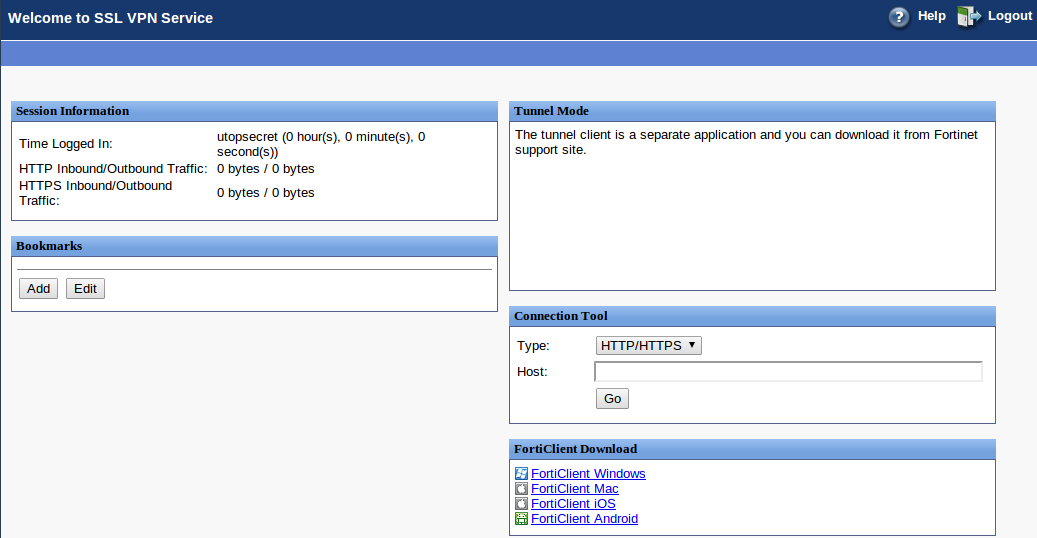
Now we can test the logins! Browse to the SSL VPN portal and enter the username and password for the user we've configured the SMS token for. When you select 'Login' a new field called 'FortiToken Code' will show up.

In a few seconds you should get the SMS token with the OTP.

Enter this authentication token in the field 'FortiToken Code' and 'Login' again. You should now be logged into the portal, congrats!

Below is the config I used to setup the FortiAuthenticator to send an OTP via SMS to my moblie for SSL VPN logins.
The steps required are:
- Get login details from your SMS provider
- Configure a SMS Gateway on your FortiAuthenticator
- Create a remote LDAP server
- Import users from remote LDAP server
- Configure user to use SMS for two factor authentication
- Add the FortiGate on the FortiAuthenticator as a RADIUS authentication client
- Add the FortiAuthenticator on the FortiGate as the RADIUS server
- Create a SSL VPN user group on the FortiGate using RADIUS as the authentication method
- Create a SSL VPN policy referencing this group
- Test out the login
The firmware versions I'm doing this config on are FortiAuthenticator (2.2.2) and FortiGate (5.0.4).
So lets begin!
For my SMS provider I decided to try out SMS Global, a quick and easy service that's perfect for testing in labs.
Login to the website and goto Tools > API Keys. Record the user-name and password thats shown here.
2. Configure SMS Gateway on your FortiAuthenticator
Login to the FortiAuthenticator and goto System > Messages > SMS Gateways. Click on 'Create New' to add your SMS Gateway.
Fill in the following fields (ensure you click 'Add another SMS Gateway HTTP Parameter to extend the number of parameters available).
Name: SMSGlobal (or any name you want)
Protocol: HTTP
HTTP Method: POST
API URL: www.smsglobal.com/http-api.php
For the fields use the following:
action = sendsms
user = SMSGlobal username (as per step 1)
password = SMSGlobal password (as per step 1)
from = SMSGlobal (or any name you want)
to = {{:country_code}}{{:mobile_number}}
text = {{:message}}
When you're finished it should look something like this:
Click 'Test Settings' to test the SMS Gateway to ensure it works. Enter in your mobile number ensuring you add + and your country code first. For example Australia's country code is 61. If I wanted to send this SMS to the mobile number 0412345678 then I'd use +61412345678.
Note that the 'from' field we used in the config is what the source name shows up in the SMS. Feel free to substitute this with anything you feel is relevant.
3. Create a remote LDAP server
Now we need to configure the remote LDAP server to import some test users. In this example I'll using our lab's Win2008 AD DC server for our user lookup.
Goto Authentication > Remote Auth. Servers > LDAP and click on 'Create New'. Fill out the details as per your LDAP server's requirements.
4. Import users from a remote LDAP server
Goto Authentication > Local User Management > Remote Users and click on 'Import'. Select the AD server we've created previously and click 'Import Users'.
Tick all the users that you'd like to import (they should show up in green) and click 'Ok'.
The users will now be imported. One thing to note is that the mobile number will be pulled from the 'mobile' attribute in AD. Ensure this is filled out prior to importing the users.
5. Configure user to use SMS for two factor authentication
Goto Authentication > Local User Management > Remote Users and edit one of the users you'd like to configure SMS OTP for. Tick 'Token-based Authentication' and select 'SMS +mobilenumber'.
Next expand 'User Information' and select the SMS gateway as the one we configured previously. Ensure that the users mobile number has populated in the 'Mobile number' field. Click 'Ok' to save.
6. Add the FortiGate on the FortiAuthenticator as a RADIUS authentication client
Goto Authentication > General > Auth. Clients and click on 'Create New'. Enter a name, the IP address of the FortiGate, a password, select 'Enforce two-factor authentication', select 'All remote users' and select the Remote LDAP server we created. Click 'Ok' to save.
7. Add the FortiAuthenticator on the FortiGate as the RADIUS server
Now log into your FortiGate and create a RADIUS server. Goto User & Device > Authentication > RADIUS Server and click 'Create New'. Enter a name and the IP address of the FortiAuthenticator. Ensure the secret here is the same as the one you configured in step 6. Click 'Test' and enter a user-name and password to test the RADIUS is working correctly (try a user that hasn't got a OTP configured yet).
8. Create a SSL VPN user group on the FortiGate using RADIUS as the authentication method
Goto User & Device > User > User Group and click 'Create New'. Enter a name for the group, ensure 'Firewall' is selected for the type and then add the RADIUS server we created in step 7. Click 'Ok' to save.
9. Create a SSL VPN policy referencing this group
Now we'll create an SSL VPN policy to test out the RADIUS logins. Note that I'm only creating a policy for the authentication of the SSLVPN for testing purposes. A proper SSL VPN config would have another policy from ssl.root > interface as well as a static route configured for ssl.root.
Goto Policy > Policy > Policy and click on 'Create New'. Select VPN for the 'Policy Type' then proceed to enter your source/destination int/address. Click 'Create New' under the authentication rules and add the RADIUS group we created previously. Lastly select the schedule and the SSL-VPN portal and click 'Ok'.
Your policy should look something like this:

10. Test out the login
Now we can test the logins! Browse to the SSL VPN portal and enter the username and password for the user we've configured the SMS token for. When you select 'Login' a new field called 'FortiToken Code' will show up.

In a few seconds you should get the SMS token with the OTP.

Enter this authentication token in the field 'FortiToken Code' and 'Login' again. You should now be logged into the portal, congrats!
4 comments:
Great article. Very helpful. I'm trying to set this up but when I receive the text it doesn't have the from address i put. Also how to I change the verbiage of the actual message with the token
Great article. Very helpful. I'm trying to set this up but when I receive the text it doesn't have the from address i put. Also how to I change the verbiage of the actual message with the token
Hi, is it possible to configure SSO with help or social login captive portal along with SMS authentication? Additionally, can you please confirm if any licenses are to be required for using SMS feature of Fortiauthenticator. I am planning to use 3rd SMS gateway but my vm is showing no license error as well.
Post a Comment